Setting up a REST API on Serverless Framework
Hello all and welcome to the first in an in-depth multi-part series on breaking down a monolithic application into a Cloud Native Lambda-based architecture!
Can you say #buzzword!?
Only kidding — we’ll be low on jargon but high on details today. I’ve not (yet) done a real series on this site, so I’m pretty excited!**By the end of this article you’ll know how to get setup and running with the Serverless Framework on AWS to create an HTTP Lambda-based API. **
Before we start — if you’ve not yet worked with Serverless — I’d suggest reading about the concepts you should understand before trying Serverless.
Throughout the series we’ll cover in-depth details about a real production migration that I’m doing in moving a NodeJS application away from a monolithic deployment (on Heroku) and onto AWS Lambda Serverless.
This process of breaking down a large application is something that a lot of companies have done recently or are looking to do (and for good reason). This type of migration is also a step that’s quite natural in the progression in a modern application lifecycle. That is, starting with a big monolith, and then breaking it down.
Why this series is different
If right now you’re thinking “Lou, wait… Aren’t there other articles that already talk about this stuff? What makes your article any different?” then you’ve got a great question, and let me take a moment to answer it.
There *are *indeed some really good articles out there. But… here’s the thing: a lot of articles show you one of two things:**A. ** The very basics of a technology, which gets you going quickly, but is light on details. e. g. “Up and running on Serverless Framework in 5 minutes“, or “Your first AWS Lambda!”.
Or, alternatively, articles look like:**B. ** In-depth topic area tutorials in with little wider context and justifications e. g. “How to set an optimal memory allocation for an AWS Lambda“.
Now, I’m not throwing shade on these articles. I too have written plenty like them.
But, what I wanted to do this time was a little different.
Because, if you’re anything like me: You need the bigger picture, and you need to know how to fill the gaps. Does that sound like you?
In the series, rather than create some ficticious to-do app I’m going to narrate real steps that I’m taking doing a real migration of a web app called Splitoo.
But, of course I’ll break it down into the details and make it as easily digestable as possible.
What I’m hoping for is that by the end of the series we’ve got a pretty well documented case study on taking a monolithic application right through to a fine-grained, microservice type application architecture. By the end we should have the series I wish I had when I started.
So, if you’re curious about Cloud Native tech like Serverless and you’re a holistic thinker you’re in the right place.
What we’ll cover today
Breaking down a monolith into smaller fine-grained services is no small feat. So let’s address how we’re going to tackle it today.
There will be two parts. In the first part we’ll cover the background context, to set the scene. We’ll discuss our current state architecture and it’s limitations. And in the second part we’re actually going to go ahead and create a proof of concept AWS Lambda with Serverless Framework. We’ll use the proof of concept to evaluate whether we want to continue with our Serverless approach, or pivot to something else.
That should cover enough for the introductory article. As the series goes on, we’ll dive into the details on concepts like architecture decisions and trade-off’s, infrastructure-as-code implementation, monitoring strategies etc.
Anyway, that’s enough pre-amble, let’s get to it!
Part 1: Context & Background
In this section we’ll set the scene for the rest of the series, so we’ll need a fair amount of detail. Let’s go through some details of the current application:
-
What the current architecture limitations are
-
Understand reasons for the migration
-
Understand how we’ll start to tackle breaking it down
What is Splitoo?
Naturally, it makes sense to start with the business domain of Splitoo. This way we’ll understand why I’m going down the path of AWS Lambda as a primary workhorse in the application stack.
Firstly what is Splitoo?
Splitoo is a finance application for sharing costs with people you know.
Users create plans, which detail a price and schedule of payment. Then, the user shares the link with a friend, colleague or neighbour to split the cost on something. Splitoo is used to split costs (or even make a profit!) on sports team memberships, costs of family movie streaming packages and more.

You don’t need to know that much about Splitoo for the purposes of this series though. But, we do need to know some details about the technology stack.
So let’s cover that off now!
Splitoo is built as a web-based Single Page Application built with a React front-end. Splitoo has a NodeJS backend for (*cough *somewhat) REST-ful HTTP Web API’s delivered with Express and uses Postgres database for persistence.
Splitoo leverages Auth0, cloud based authentication for login (both social, and vanilla username/password) and uses quite a bit of Stripe to do the heavy lifting for payments.
The entire application is built with and deployed by Heroku, as one big build and deploy step (everything ships at once). Lastly, Splitoo operates with a single staging environment, before promotion to production.
Does that all make sense so far? Hopefully!
With the tech stack in mind let’s take a closer look at the Splitoo architecture.
The Splitoo Architecture
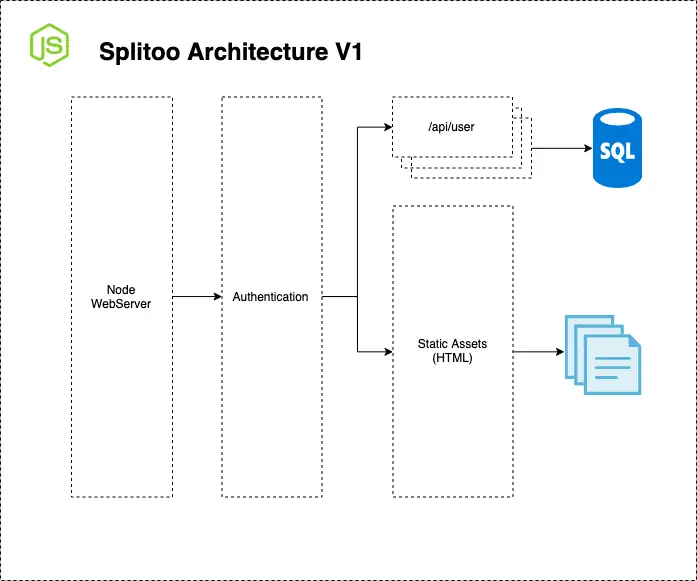
As you can see from the diagram both the front and backend is served from the same process. It’s almost an old school three-tier architecture.
A three-tier architecture is an application built in (you guessed it!) three tiers. Usually this is a presentation layer (with no business logic), an application layer (with lots of business logic) and a persistence layer that stores the current state of the application.
The three-tier architecture is great for getting simple projects off the ground as it keeps things nice and simple. It’s the Volkswagen Golf of architectures. Safe. Reliable. Get’s the job done. But, if you suddenly find yourself overrun with newborn children (or flooded with cash) you might need to branch out to a family van, or a zippy sports bike, depending on what you’re in to!
Whilst I sing the praises of the three-tier architecture as a nice, vanilla get-up-and-running type architecture, it does have some downsides.
Let’s address these now.
The main difficulties with this architecture are:
-
Performance optimisations are hard. For instance: requests for basic assets (files, images, css) share resources with the API’s of the back-end. So if Splitoo receives a surge of traffic from Google for the homepage, users accessing their plan details will be affected.
-
** It’s not that easy to monitor**. The infrastructure is on a shared host, so it’s hard to get fine grained metrics. If we have a single API that’s misbehaving (let’s say using too much memory) we risk taking down the entire application.
-
** It can get messy. **A monolithic app like this can quickly become an infamous ball-of-mud architecture where concerns are totally muddled and the maintenance cost spirals out of control.
-
** It has a riskier deployment process. **Monolithic applications by definition have to be deployed all together. This means you risk sinking the full app at the cost of updating one small part. Also, as an application (and business scales) it makes good sense to break an application down so that different teams can deliver independently.
So — if we know that there are some problems with our current monolithic approach, that raises the question: What do we need to do to remedy this?
Firstly, we need to acknowledge that a monolith might not be working so well for us, and that we might want to experiment with different architectural patterns. And if we want to do that, we need to first do something called finding an applications seam.
What does that mean? Well, I’m glad you asked, because that’s up next!
Splitting the app: by finding it’s seams
Breaking down a monolithic application involves a process that Sam Newman calls finding an application’s seams (Side note: I really rate his book Building Microservices and you should read it).
But what does it mean to find an application’s seam? Let me explain…
Finding and application’s seam is a concept applied to micro-service based architectures. The process is in essence finding a part of a current application that can be easily moved, implemented elsewhere and re-integrated with the monolith. Hopefully the new service has a more deliberate API and design pattern!
So, given that we already know about the Splitoo architecture, where are the application seams?
Well, there are actually quite a few.
But… for the purpose of this first article, which is oriented on AWS Lambda’s we’ll be looking at breaking out some of the back-end API’s.
A lot of the existing backend performs the task of proxying some data to a Stripe API. Because of the nature of these API’s it makes a lot of sense to investigate Lambda’s as a tool to perform this type of computation. Why? Because Lambda’s are on-demand, short-lived and stateless, just like a lot of the Splitoo API’s.
It’s worth noting now: It’s not all roses! The benefits of AWS Lambda also come with a trade-off such as greater complexity, overhead in additional deployment processes etc. So, with this in mind, we should really investigate further whether it’s the right option for us.
Part 2: Creating Our First Serverless Lambda
Now that we’ve established that we want to work with AWS Lambda and why let’s go over the steps to setup.
The goal of this section is to create a proof-of-concept Lambda which will allow us to evaluate whether we will remedy the aforementioned difficulties of the monolithic approach.
Introducing Serverless Framework
To get up to speed with AWS lambda quickly, we’re going to leverage a tool called Serverless Framework.
Serverless Framework is a pretty neat little API / SDK that gets you up and running on Serverless in no time. The real selling point of the framework is how it solves issues such as writing our infrastructure-as-code by creating all our resources required for an AWS Lambda setup.
If you have ever setup infrastructure like this before, you know that there are quite a few nuances and it can be quite tedious. But, in our case we’re not striving for perfection (just yet!) so speed off the ground works well for us!
Creating our first Serverless Lambda
So, let’s go ahead and create our first Lambda, which as you’ll soon see is surprisingly straight-forward.
If you want to follow along with the rest of this tutorial, I’d suggest setting up a git repo to store our example. You’ll also need some AWS credentials to hand.
Firstly, you’ll need the SDK which you can install like so:
npm install serverless -gNow, with the SDK installed we can go right ahead and make a Lambda, based on one of the out-of-the-box Serverless Framework templates. If you did create a repo before, run the following command at the root of your directory. Don’t worry if you didn’t, just run in any directory you like for now.
serverless create --template aws-nodejsAwesome!
Now you should have a basic Lambda setup in your current directory.
Now, it’s no use having just our Lambda code on local, what we want to do is get it hosted on our AWS account so that it can be called from anywhere in the world. To deploy the Lambda, just run:
serverless deployNow your AWS infrastructure and also your Lambda function will be created in the cloud. And if you want to test, you can execute your new Lambda like so:
serverless invoke -f hello -lPretty simple? At this point I was pretty impressed.
Serverless Framework is doing a lot of heavy lifting for us here, such as creating a CloudFormation Stack (which is a grouping of our AWS resources).
With that up and running I’d advise you to hit pause for a moment and go take a look in your AWS console at the resources we’ve just made. You should be able to see the following resources:
-
Log groups
-
An S3 bucket
-
A Lambda version
Attaching an API endpoint to our Lambda
What we’ve got so far is pretty cool.
But, there is a problem.
We’ve not actually exposed our Lambda to the outside world. It’s currently only executing within AWS privately.
What we want to do now is to attach an HTTP route to our Lambda so that we can call a URL and trigger our Lambda. This is done using the AWS service API Gateway.
Luckily, with Serverless framework this is dead easy. All we have to do is add the following to our serverless.yml file. It should even be in there already, so you just un-comment the code.
events:
  - http:
      path: email-template
      method: get
When you’re done, re-run the deploy command. Now, we should have a Lambda, running up in AWS attached to a public endpoint (the URL is shown in the console output). That’s really sweet!
Creating Two Environments
We’ve come so far, there’s one last piece i wanted to cover with you.
By default, Serverless sets your created Lambda as a development environment. But we don’t want to always deploy directly into production, sometimes we might want to test similar functionality in a safe setting. For that, we’ll need a test environment.
To create a production environment all we have to do is pass a different flag to our Serverless framework which will set it all up for us. So to have two environments all we need to do is take our existing function and deploy it twice (with slightly different arguments). So go ahead and run the following:
serverless deploy --stage=productionThat will now deploy another Lamdba (alongside the other). Now you’re up and running with a test environment and a production one!
At this point, I was very impressed. Setting up the proof of concept took next to no time at all. What’s we’ll be doing next is building on top of our newly created proof-of-concept to add some other essentials. But, that would be a little too much ground to cover in one day, so we shall wrap up there and be back soon with the next instalment.
Function Executed!
And that concludes the beginning of the series! I didn’t want to take on too much this first time around, as I wanted to give you a little time to experiment with the basic Serverless Framework setup. In future, as promised we’ll start to look at how to make our setup more advanced.
So in future articles, we’ll cover:
-
Monitoring tooling
-
Application architecture
-
Security measures
-
Build process
-
…and more!
Hopefully you now have more of an understanding of how you can get started with Serverless Framework as we take our first step in breaking down a Monolithic application and moving towards AWS Lambda. If you’re keen to get started, I’d suggest you follow these steps when setting up your AWS account so that your account doesn’t get hacked.
Before I go: If there’s anything I didn’t cover today that you’d like to know about, please drop a comment below. Don’t forget that you can also sign up to the newsletter for future updates and the rest of the series. See you in the next post!

Lou Bichard
Hey I'm Lou! I'm a Cloud Software Engineer. I created Open Up The Cloud to help people grow their careers in cloud. Find me on Twitter or LinkedIn.
See all posts →Latest posts by Lou Bichard (see all)
- 2024 Summary - A year of trips and professional work - January 9, 2025
- 2023 Summary - Data Driven Stories About The Cloud - December 31, 2023
- 2022 Summary - The Open Up The Cloud System - January 1, 2023