The marketing around Serverless likes to make it out like “spinning up” a function is a simple task with no other dependencies. However, Serverless functions have to be triggered somehow. And one of your options is to use AWS Lambda with an ALB.

But if you’ve just learned AWS Lambda and want to set it up with an ALB you’re about to run face first into a ton of new jargon: target groups, listeners, listener rules, ports etc. So if you’re not already familiar with AWS ALB and it’s various ideas you’re going to need to get up to speed.
By the end of this article you’ll understand the main concepts related to AWS ALB’s so that you can expose your Lambda function publically.
AWS Lambda with an ALB
Setting up AWS Lambda with an ALB gives us many benefits including a central source to funnel and monitor our traffic, and a single point to attach things like HTTPS certificates and authentication.
To understand how to use AWS Lambda with an ALB, we’ll need to discuss the following ALB concepts:
- Networking
- Listeners
- Listener rules
- Target Groups
- Response Formats
- Attaching Domains
And for today’s article, I’m not going to do a typical “here just copy this” tutorial, instead I’m going to focus more on running you through the main concepts so that you can implement a design that makes sense for your scenario. But, if you do want to follow along, I’ll give a Terraform snippet for each resource we discuss, which should you a head start at least.
Sound good? We’ve got a few concepts to cover. Let’s get to it!
Create the ALB (By Choosing A Network)
The first thing you’ll need to do is assess which network your ALB is going to be launched in.
If you do want your ALB public facing, you’ll need at a minimum: a VPC with an internet gateway, two public subnets (on different availability zones) and a security group. But don’t worry if you’ve not got this setup, AWS does have a default option, let me explain.
Most resources in your AWS account will need to be put into a network, and an ALB is no different. To help you out AWS gives every new account a default network that you can use.
The default network has everything you’ll need for today with the exception that: you’ll need to open up your security group to allow traffic to flow to your ALB listener (but more on this later).
Once you’ve figured out where you want your ALB, you can go ahead and create it in your designated subnets.
Tip: If all of this networking stuff seems like I’m talking another language, I’d suggest reading the article: AWS networking fundamentals: A simple guide for software engineers.
Add a Listener
After you’ve created your load balancer in your given network you’ll need to setup a listener to tell the load balancer what types of requests you want to listen to.
A listener simply “listens” out for incoming requests. By default your ALB isn’t listening for any traffic, so you’ll have to tell it to. For this example, we’re going to allow port 443 (HTTPS) traffic.
You’ll also need to setup a default action. This simply tells the load balancer what to do if we receive allowed traffic but don’t have a corresponding action to perform.
But we don’t want all of our traffic to hit our default action, we want to redirect it to our lambda. And we do that using a listener rule…
Note: In order to accept HTTPS traffic, you’ll want to setup a certificate. This can be done in ACM, Amazons certificate issuer.
Add a Listener Rule
A listener is what assigns your servers (in our case, a Lambda) to a given incoming routes on your ALB. Essentially a listener rule is mapping incoming requests to servers. Which is the main job of the load balancer.
I like to think of listeners as external to the load balancer and listener rules internal. With listeners traffic can hit your ALB, but without rules it cannot be processed or forwarded etc.
In the above example we’re forwarding all traffic on the /static route to our “target group”.
But wait — we’ve not talked about target groups?
Target Groups
A target group is simply a collection of resources (read: servers).
We don’t point our load balancer directly to our server as… that’s not really “load balancing” as much as it is simply proxying requests. So target groups allow us to create an abstraction layer between the load balancer and our servers. Which is necessary for our ALB to work.
In a traditional server-based architecture we’d (usually) register many servers against a target group as that gives our application high availability. We achieve high availability as we can ensure that our load balancer serves requests even if a server is down.
So now you can go ahead and point your target group to your Lambda. And now that you have a target group setup, that does conclude the infrastructure we’ll need to setup in order to run our Lambda behind our ALB. Woohoo! But there are just a few other things you need to know…
Respond The Right Format
Now that you have your infrastructure setup, you might make a request to your load balancer and see that it returns 500 or hangs. And that is likely because of the format your lambda is responding with. You can’t simply respond a payload to the external traffic as the load balancer also needs to send other metadata, such as the status code.
And the way that we provide the metadata for our ALB to respond is through our Lambda response format. As you can see above, we’re giving some additional metadata details to the ALB, but in the end the ALB will only forward on the body section, not the whole payload.
And that leads us onto our final topic…
Attaching A Domain
If you made it this far, following along you could hit your ALB via it’s public endpoint (you can find this endpoint by going to your EC2 dashboard in AWS).
But I’ve got to admit, the AWS url is pretty confusing looking, so it’s likely you’ll want some kind of nice endpoint for your API like api.yourawesomesite.com. To add our DNS entry we’ll need to add a record into the Route53 service.
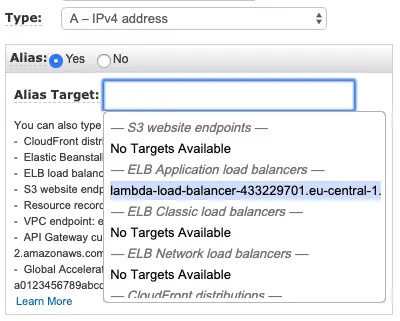
All we need is an A record that redirects to our ALB resource and we do that by pointing our record to our ALB’s dns_name and zone_id. It’s pretty simple to do in the interface too, as you’ll get a dropdown that allows you to select your load balancer from a list.

Route53 ALB A Record
And voila!
Godspeed, ALB expert!

A Lambda with an ALB
If you followed along, you should now know how to use AWS Lambda with an ALB.
You should have an ALB that…
- Is provisioned inside the network you want.
- Has HTTPS public traffic.
- Sends a static 404 for un-known paths.
- Routes traffic from your
/staticroute to your target group. - Has an HTTPS cert and a clean domain attached.
- Has your Lambda grouped into a target group
I told you there would be a fair amount of technical terms, right? 😂
And that’s all you need to get started. Now you can start looking into more advanced concepts like hooking up multiple lambda’s to different routes.
If you’re keen to learn more about Serverless, be sure to check out the Serverless Ultimate Guide, and the checkout the Serverless With Lambda: Zero To Hero free email course.
Speak soon, Cloud Native friend!
- 2023 Summary: Data Driven Stories About The Cloud - December 31, 2023
- 2022 Summary: The Open Up The Cloud System - January 1, 2023
- Open Up The Cloud Newsletter #30 (January Recap 2022) - March 1, 2022